Ads 468x60px

Rss Feed Options
Find Us On Facebook Follow Us On Twitter

Learn how to Jailbreak Iphone4, 3gs, ipod touch 3g,4g and iPad 1


Jailbreak iOS 4.3.5 with RedSn0w

In this post, I will take you through the step by step procedure to jailbreak iPhone 4, 3GS, iPod touch 3G, 4G on iOS 4.3.5 using Redsn0w. RedSnow is one of the most popular Jail Breaking tool developed by the iPhone Dev team. I used this tool to jail break ma iPhone 3gs, it's so simple to use it.

Step 1: Choose below to Download iOS 4.3.5 for your phone.(Direct Download)

Download iphone 4(GSM)
Download iphone 3GS
Download iPod touch 3G
Download iPod touch 4G
Download iPad 1


Step2:
Download RedSnOw 0.9.8 for Windows
Download RedSnOw 0.9.8 for Mac

Step3:
Click here to Download iTunes 10.5.2(latest Version)

Step4:
Extract the RedSn0w zip file by double clicking it.


Step 5:
Launch
the redsnow application from the folder we extracted earlier


Step 6:
Opens Redsnow Application


Step 7:
Plug Your iPhone into the computer and make sure it's OFF then Click the Next Button.

Step 8:
Press “Browse” to navigate iOS 4.3.5 firmware and then click next.

Step 9:
Once you press next, you will see four options, check on “Install Cydia” and press next.
Step 10:
Put your device into DFU mode.
  • Connect your device with iTunes 10.5.2.
  • Hold down the Power and Home buttons together for 12 seconds.
  • Release Power button but keep holding the Home button for 15 seconds.
RedSn0w will now guide you through the steps to get into DFU mode.
Release the Power button and continue holding the Home button until RedSn0w detects the device.

Step 11:
This time Uncheck ”Install Cydia”and just select ”Just boot tethered right now”.
When your iPhone 3G comes back up, you’ll notice Cydia has a blank white icon. Allow Cydia to reorganize, then accept the update it offers. When Cydia restarts, you should see its REAL logo now.

That’s it. You Have successfully jailbroken iPhone iOS 4.3.5 firmware with RedSn0w. ;)

Read more >>

Microsoft Touch Mouse (Guest Post)


The touch mouse which is Microsoft’s latest venture in the world of touchis the most Impressive yet. It is made exclusively for Windows 7 and has allthe features needed to make your life easier. The Touch Mouse works on avariety of operating systems, including Apple’s OS X, but the touch gestures onlywork correctly on Windows 7.


SPECIFICATIONS:

· 2.4 GHz wireless technology.
· Windows 7 OS Compatible.
· USB wireless receiver.
· 30 ft Operating distance.
· BlueTrack sensor technology.
· 6 months battery life.
'
DESIGN
It has an elegant lookwith a simple black matte plastic structure that is easy to use for both leftand right handed users. The left and right buttons are distinguished by asimple slit in the middle. It has a simple pattern of raised x’s and dots on itthat indicates the multi-touch parts on the surface. The mouse has roundedcorners and a comfortable slope to rest your hand on. The bottom of the mousehas a white plastic surface for the two AA batteries for the device. There isalso an area inside the bottom of the mouse to house the USB transceiver.Microsoft also ships a USB extension cable as part of the package. The touchmouse incorporates the BlueTrack technology that enables smooth tracking on literallyevery surface (including granite, marble, wood and carpet!!!) apart from clearglass or mirrors


SETUP
The setup of the touchmouse is simple and speedy. You will simply have to insert the USB transceiverinto a spare USB port and Windows 7 will automatically install the relevantdrivers required. By default, the Touch Mouse is programmed for right-handedusers, but you can swap the button orientations using the Microsoft Mousedriver software. You can also disable the touch functions within this softwareif you would want to. Windows7 users will be prompted to download IntelliPointsoftware to support multitouch gestures. On completion of installation a videodemonstration is presented on how to use multitouch gestures.


GESTURES
The mouse supports a widerange of gestures, using one finger, two and three fingers. Using one figureyou can scroll vertically or horizontally and a quick flick in the respectivedirection will trigger a fast scroll. Swipe your thumb left or right acrosseither side of the mouse to page through image slideshows or to advance forwardand backward through pages within your Web browser. Using two fingers forwardand backward or up and down will maximize and minimize a window. Move threefingers forward to display all the windows on your desktop, or backward tominimize them all.
FEATURES

· Enhances Windows 7 navigation

· Allows easy switching between tasks

· Easy to learn and fun to use

· Uses gestures to quickly scroll and pan,navigate, and manipulate content

· Helps you get more done in less time

· Improved task switching on Windows 7 givesyou superior mouse performance and experience on the PC


The mouse is a sturdy, wellbuilt and comfortable device to use. The joy of gesture support in Windows 7makes this a must have gadget for every Windows 7 user!! Its price in Indiawould be around Rs.3,999/-
Read more >>

Pelican Hardback Case


Suffering mini heart-attacks everytime you drop your iPad, netbook or tabletPC?? Here’s some good news for youfolks!!


Itis the new 1075 Hardback Case introduced by Pelican. It is constructed of highstrength ABS and is dustproof, watertight, and crushproof.


It has an easy open latch that remainsshut when under pressure or after an impact. The 1075 also has a built-inautomatic purge valve keeps water and dust out while balancing air pressure. The1075 also comes equipped with a molded liner that adds shock protection andwill not scratch your tablet. Also included is an integrated easel forhands-free viewing in horizontal or vertical position.


Wantto know what’s more to it?? You have added room for storage underneath for youradapters, ear buds, cables etc. It even comes with a strap so you can slingit around your shoulder and walk your way without having to worry about bangingon the wall or door!! In short –it is “your office on the go!”

Interior Dimensions (LxWxD):
(11.38 x 8.19 x 1.63)
(28.9 x 24.8 x 4.1 cm)


Exterior Dimensions (LxWxD):

(12.38 x 9.75 x 2.13)

(31.4 x 24.8 x 5.4 cm)


Read more >>

How Long Has Your System Been Running???


Here is how yo verify system uptime:

Click Start-->Run and type cmd to open a command prompt


At the Command prompt, type systeminfo.

Scroll down the list of information to the line that says System Up Time.

This will tell you in days, hours, minutes and seconds how long the system has been up.

Read more >>

Firefox Speed up Tweaks!!!


Yeh, firefox is already pretty damn fast but did you know that you can tweak it and improve the speed even more???

That's the beauty of this program being open source.
Here's what you do:

In the Address bar, type “about:config” and press enter. This will bring up the configuration “menu” where you can change the parameters of Firefox.


Note that these are what I’ve found to REALLY speed up my Firefox significantly - and these settings seem to be common among everybody else as well. But these settings are optimized for broadband connections.

Double Click on the following settings and put in the numbers below - for the true / false booleans - It will change when you double click it.


Code:

network.http.max-connections – 48
network.http.max-connections-per-server – 16
network.http.max-persistent-connections-per-proxy – 8
network.http.max-persistent-connections-per-server – 4
network.http.pipelining – true
network.http.pipelining.maxrequests – 100
network.http.proxy.pipelining – true
One more thing.Right-click somewhere on that screen and add a NEW -> Integer. Name it “nglayout.initialpaint.delay” and set its value to “0”. This value is the amount of time the browser waits before it acts on information it receives.


Now you should notice you’re loading pages MUCH faster now!
Read more >>

How To Increase Internet Connection Speed in Windows Xp, Windows 7


This is a nice little tweak for Windows XP, Windows 7. Microsoft Windows reserves 20% of your available bandwidth for their own purposes!!(Think they it use it for updating and interrogating your machine blah blah)
Follow the steps below in order to get it back!!
Click Start-->Run-->type gpedit.msc


This opens the group policy editor.
Then go to:Computer Configuration-->
Administrative Templates-->Network-->
QOS Packet Scheduler-->Limit Reservable Bandwidth.

By default, the QOS Packet Scheduler limits the system to 20 percent of the bandwidth of a connection, but you can use this setting to override the default.
Double click on Edit Plocy Settings
A new Dialog Box appears and It will say it's not configured, So the trick is to ENABLE reservable bandwidth, and set it to ZERO (This will allow the system to reserve nothing, rather than the default 20%) See the Picture Below:
Note:100% Working and tested on windows XP, Windows 7, Windows Vista, 2000 and ME.


Read more >>

Requests for Softwares/keys/cracks/patches here


1. 3DS MAX 2010 Correct and 100% working key.
2. Adobe Photoshop CS 5.1 free serial key.

1.Install 3DS MAX 2010 Correct and 100% working key.


 Follow the steps below:
(Note:Make sure to turn "OFF" your internet connection)

1.Install Autodesk 3DS MAX.
2.Use as Serial 666-69696969, 667-98989898, 400-45454545 or anything matching this template.
3.Use as Product Key 128B1
4.Finish the installation & restart Max.
5.Choose to Activate.
6.Once at the activation screen:
Start XFORCE Keygen 32bit version if you are installing a 32bit application and64bit if you are installing a 64bit application.
Click Here to Download 3ds Max 2010 32bit keygen!
Click Here to Download 3ds Max 2010 64bit keygen!
7.Click on Mem Patch (you should see succeeded).8.Copy the request code into the keygen and press generate.
9.Now copy the activation code back to the activation screen and click Next and thats it!!
You have a fully registered autodesk product.

2. Adobe Photoshop CS 5.1 free serial key


SERIAL:1330-1363-1206-9398-1328-8912
Read more >>

Windows 7 USB/DVD Tool


Well, with the world wide release of Windows 7 on the 22nd of October 2009 Microsoft released a small utility to create Windows 7 bootable USB/DVD called “Windows 7 USB/DVD Download Tool”. Though this tool is just 2.7 MB size , but still its very powerful enough to create bootable USB drives.

USING WINDOWS 7 USB/DVD TOOL
1. Download and install Windows 7 Dvd/Usb Tool: Windows 7 DVd USB Tool
Windows 7-Dvd-Usb-Tool.exe (official link has been pulled due to possible violation of GPL license)
2. Run the Windows 7 USB/DVD Download Tool.


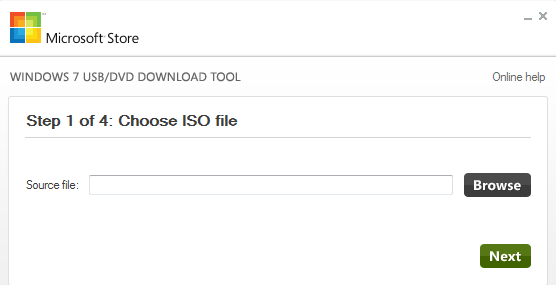
3. In the Source file box click Browse and select the file in the Open dialog box, then click Next.


4. In this article I will be creating Windows 7 Installation files on a USB, so click on USB device


5. For copying the Windows 7 file to a USB  drive, select your USB device in the dropdown list and click Begin copying.


Note: 1.You need a USB device that is at least 4GB. 
             2.Do make sure that no important data is stored on the USB  drive as it will be formatted (deleted).
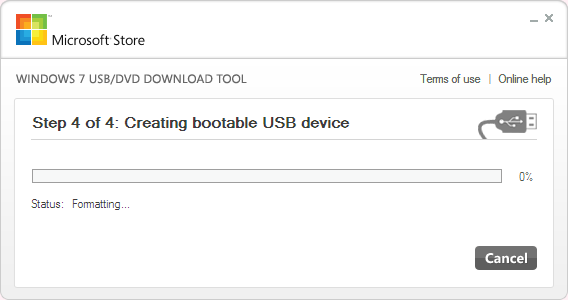
6. WUDT will format storage media, and then copying Windows 7 files over to the media 


Once bootable USB device created successfully, user can install Windows 7 by navigating to the root of USB flash drive and double-clicking Setup.exe. It is also possible to install Windows 7 directly from the USB key booting from the Boot menu, Where Windows 7 installer will be automatically launched. :-) 
Read more >>

Install Windows 7/ Vista using a USB Drive/ Create a Bootable USB Drive


A common problem people face while installing windows on their systems is their CD/DVD not working properly. Many times the disks might become corrupt and the installation stops at a particular point. So to install new Operating System, you need to make a bootable USB Drive so that you can install Windows Operating System without any hassle.

Things you needed:

. A USB Drive, Minimum of 4gb.

. Windows 7/Vista Setup Files.

      Let's create a Bootable USB Drive!!

      1. Plug the Pen Drive into your Pc.
      2. Note the letter of the Pen Drive from My Computer.
      3. In the Start Search Box Type cmd and Press Enter.


      4. Now, type diskpart in the command prompt, a new window will open as shown in the image.

      5. To show the list of drives, type list disk. Here Disk 2 is the USB disk.


      6. Now type the following commands one by one and hit enter.(It is assumed that your USB disk
      is Disk 2, if it's Disk 1, use Disk 1 in the command).

      SELECT DISK 1

      CLEAN

      CREATE PARTITION PRIMARY

      SELECT PARTITION 1

      ACTIVE

      FORMAT FS=NTFS (Formatting may take a few minutes. Be patient.)

      ASSIGN

      EXIT (Now the disk partition program will exit, now we need to give some more cmmands.)


        7. Insert the Windows 7 Installation DVD in your optical drive and note down the Drive letter.

        8. Here i am assuming DVD drive as "F" and USB drive as "K".

        9. Now type F:CD BOOT and Hit Enter.

        10. Next type BOOTSECT.EXE/NT60 K: where K is the USB drive letter. This command will update
        the drive with BOOTMGR compatible bootcode

        11. Now exit the command prompt and copy all the files from the windows 7/vista DVD in the USB drive.(Just make sure you dont cause any errors)

        12. Now Enter the Bios system accordingly by pressing the delete key.(This may vary some times it will be F2 or F12. It depends on the type of your system. Any how during the Startup, your system will display which key to press to enter the Bios).

        13. Now Select the USB/ Pen Drive as the first boot driver.(Set the first boot priority to USB drive.)

        14. The computer will boot from the USB drive and the installation will begin as normal. :-)

        Read more >>

        ACTIVATING WINDOWS 7 USING WINDOWS 7 LOADER v1.5


        Windows 7 loader v1.5 activates all Windows 7 versions. Ultimate, Professional, Enterprise, Starter, Basic, Home etc. This Activator is 100% working and tested. Works with 32bit(x86) and 64bit(x64).The users can validate the illegal pirated copies of Windows 7 as genuine status forever and permanently and also allows you to download windows updates.

        BEFOR USING THE ACTIVATOR


        Steps For Activating Windows 7 Using Windoes 7 Loader
        1.Click Here to download Windows 7 Loader.
        2.Double Click on windows 7 loader. A dialogue box opens. It should look like this:
        3.Select your Desired "OEM".After selecting your "OEM", you should see an Alert as shown Below.


        4. The next Step is clicking "Install 7Loader". You should see an alert as shown below:


        5. Press "ok" and let the computer restart.
        6.It says "Windows has been Activated".Notice the "Toshiba" Logo and Manufacturer's Information 


        Read more >>